Setting Up Credentials
Credentials are the authentication keys and tokens that allow MCPBundles to access external APIs on your behalf. This guide covers everything from adding your first credential to advanced management.
Why Credentials Matter
Before tools can access external services (like Resend, Google, Slack), you need to connect credentials. Without them:
- Tools won't appear in your AI
- Bundles show "Connection Error" status
- You can't test or use tools
With valid credentials:
- All tools become immediately available
- Bundles show "Ready - Credentials valid" status
- Your AI can perform real actions
Understanding Credential Types
MCPBundles supports four authentication methods:
| Type | Description | When It's Used |
|---|---|---|
| API Credentials | Simple API key (copy/paste) | Resend, OpenAI, HubSpot |
| OAuth 2.0 | Secure login flow (popup) | Google, Slack, GitHub |
| OAuth 1.0 | OAuth 1.0 authentication flow | Twitter, some legacy APIs |
| No Authentication | Public APIs requiring no credentials | Weather services, public data APIs |
Quick Start: Adding Your First Credential
You can add credentials from multiple entry points in MCPBundles:
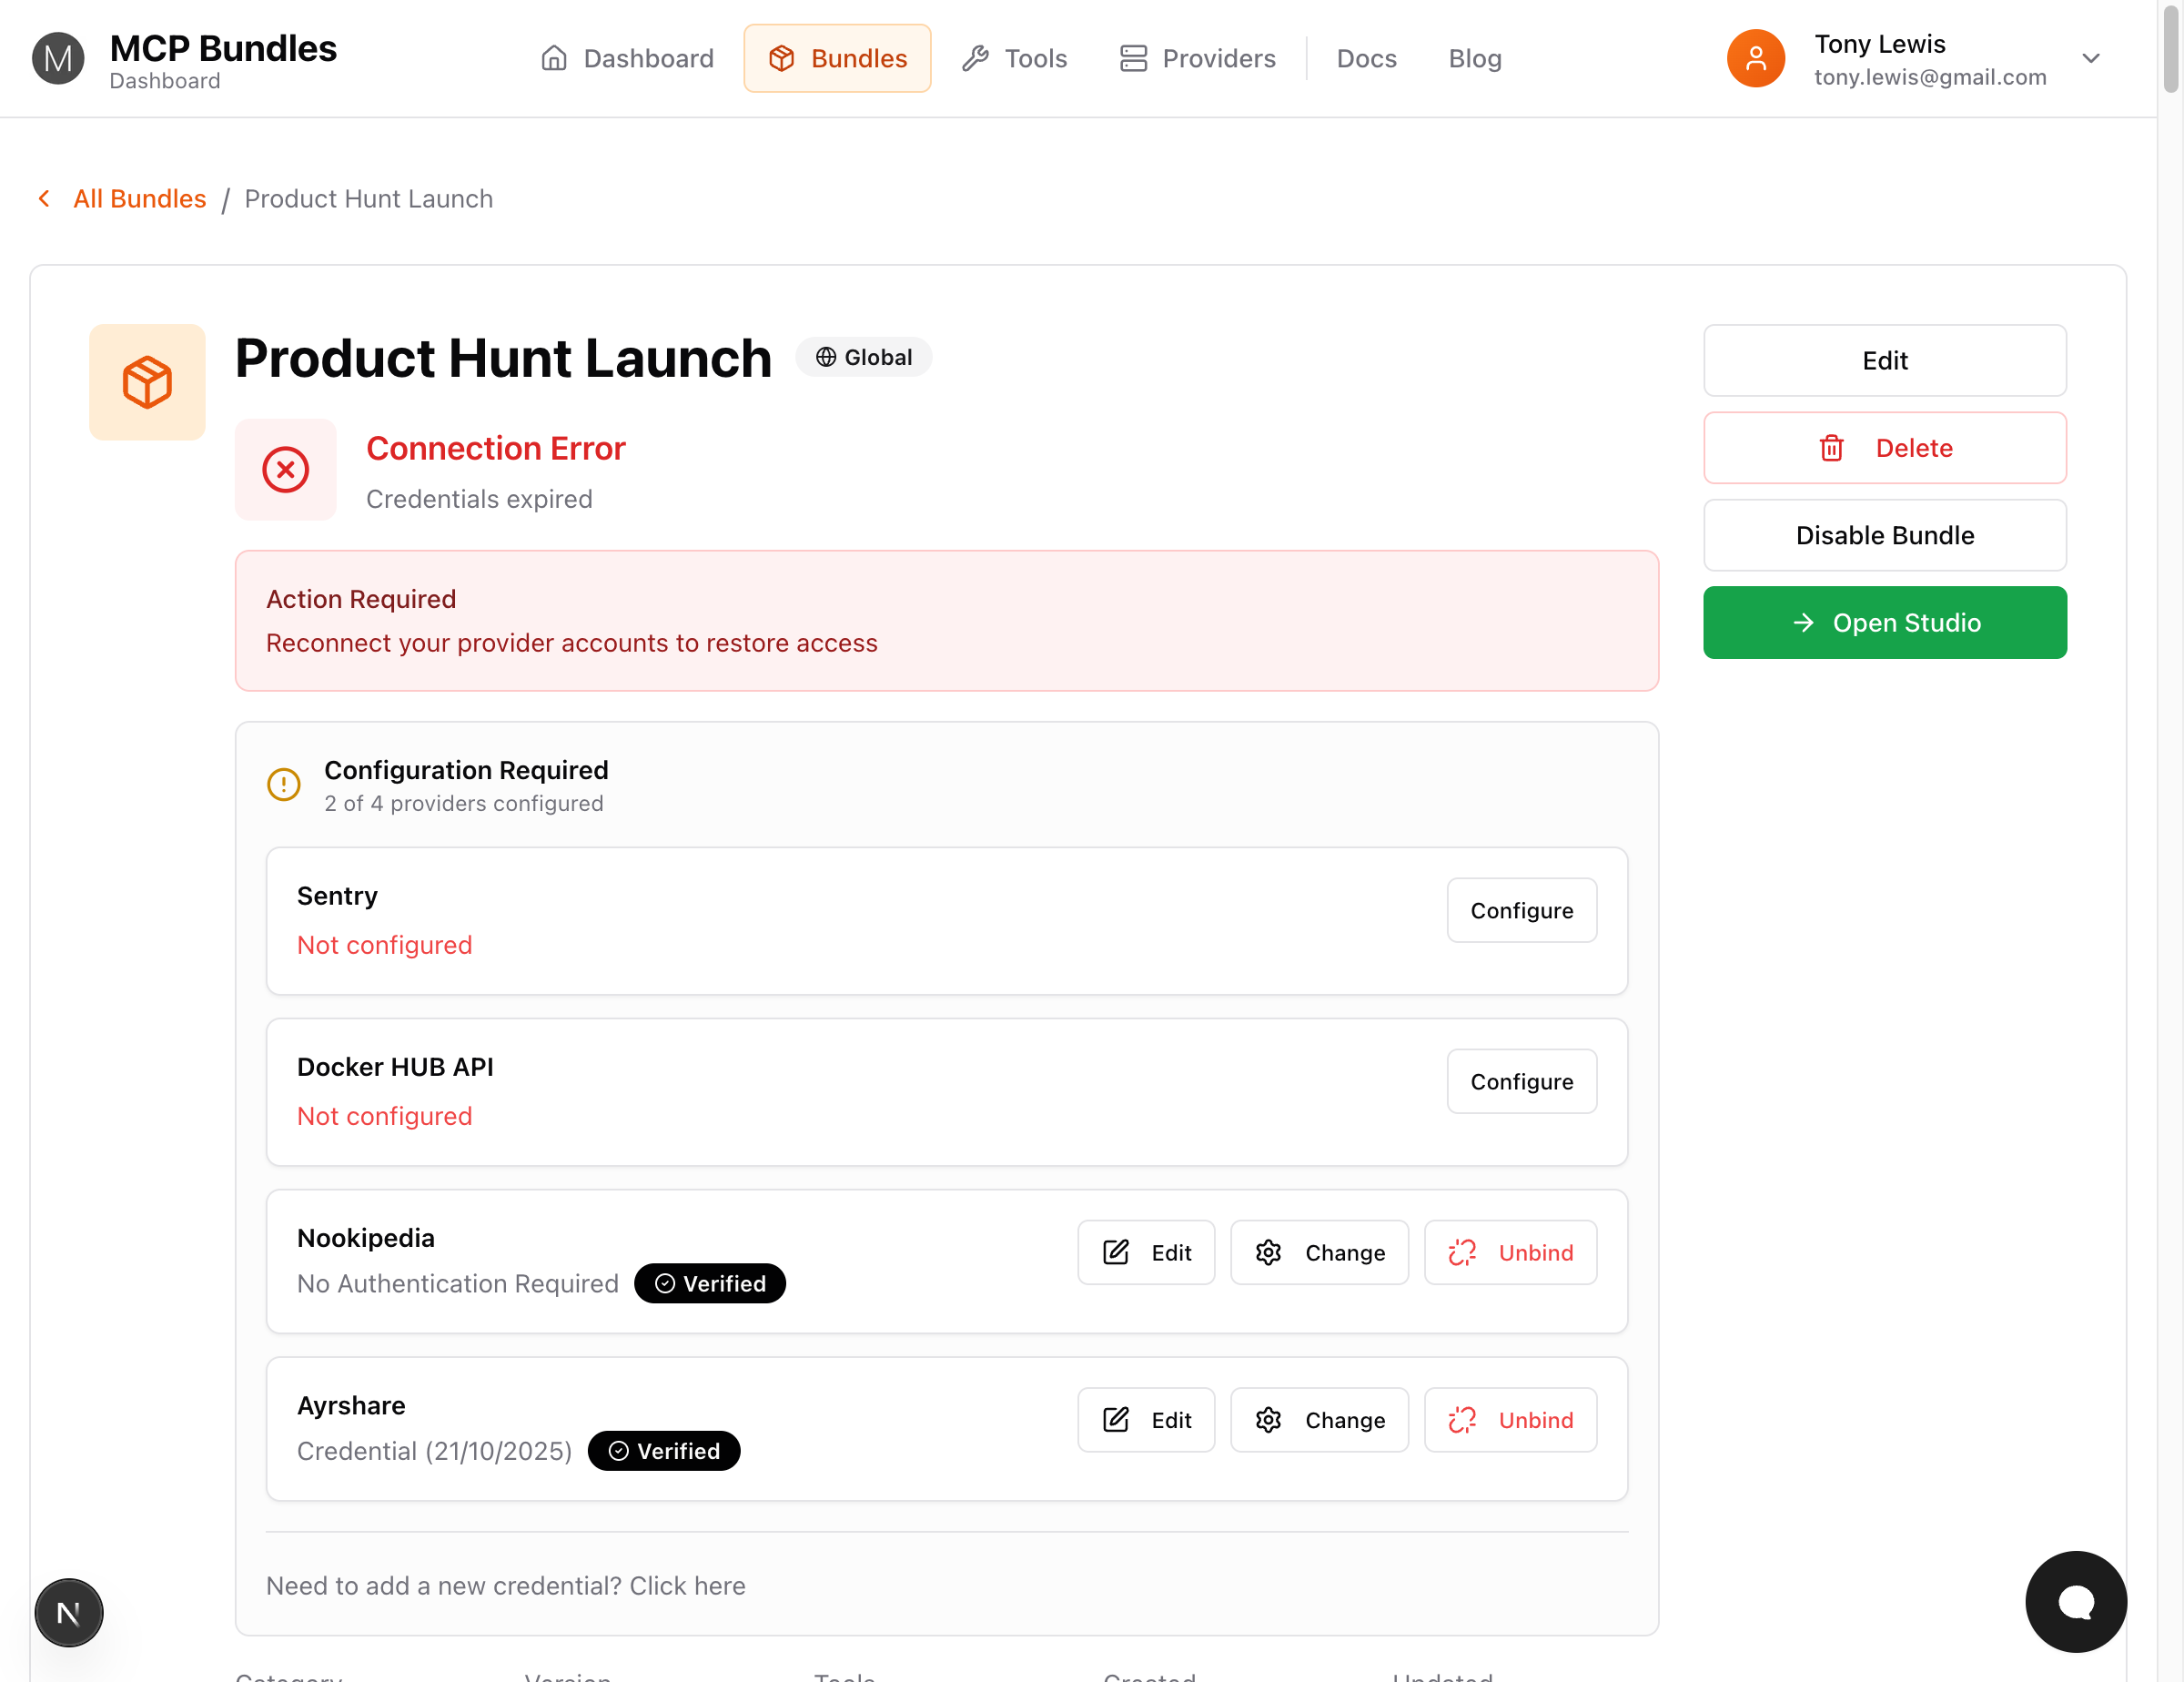
Option A: From Bundle Page (Recommended)
When to use: Setting up a specific bundle's required providers
- Go to Dashboard → Bundles
- Click on a bundle that needs credentials
- Look for the "Configuration Required" section
- Click "Configure" next to a provider
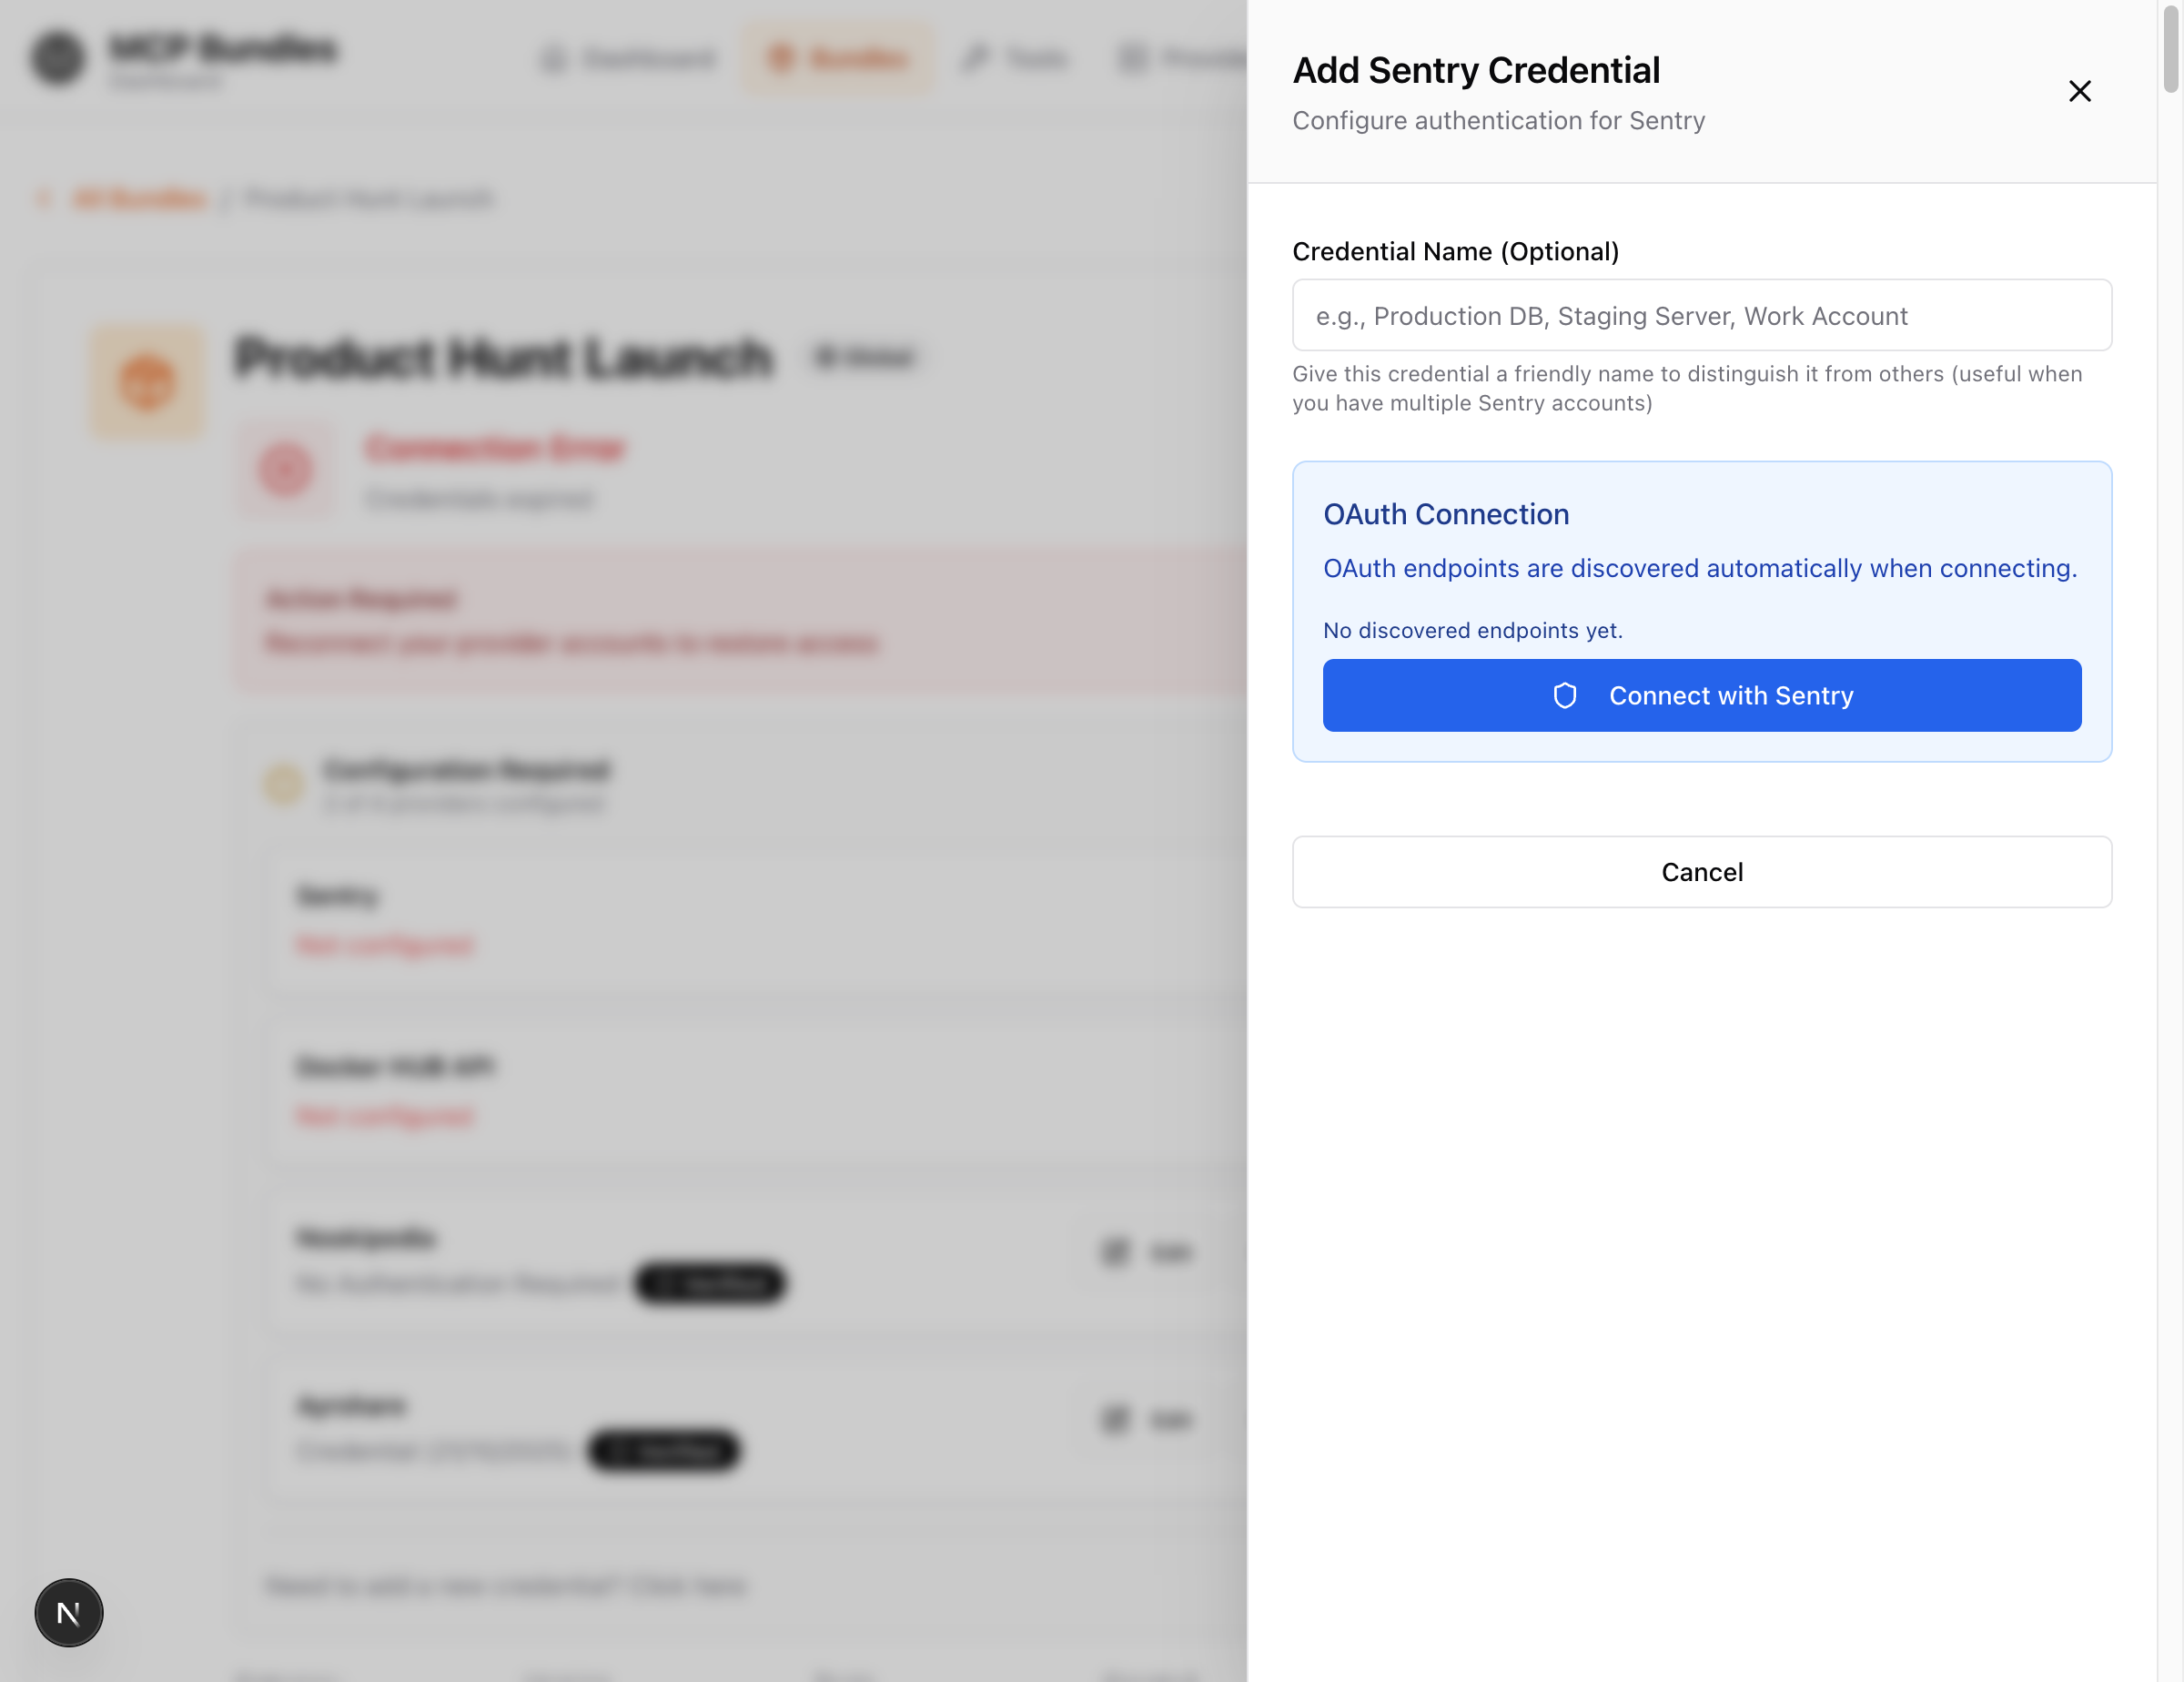
- In the dialog, click "+ Add New Credential"
- Credential panel slides in from the right side of your screen
Option B: From Provider Page
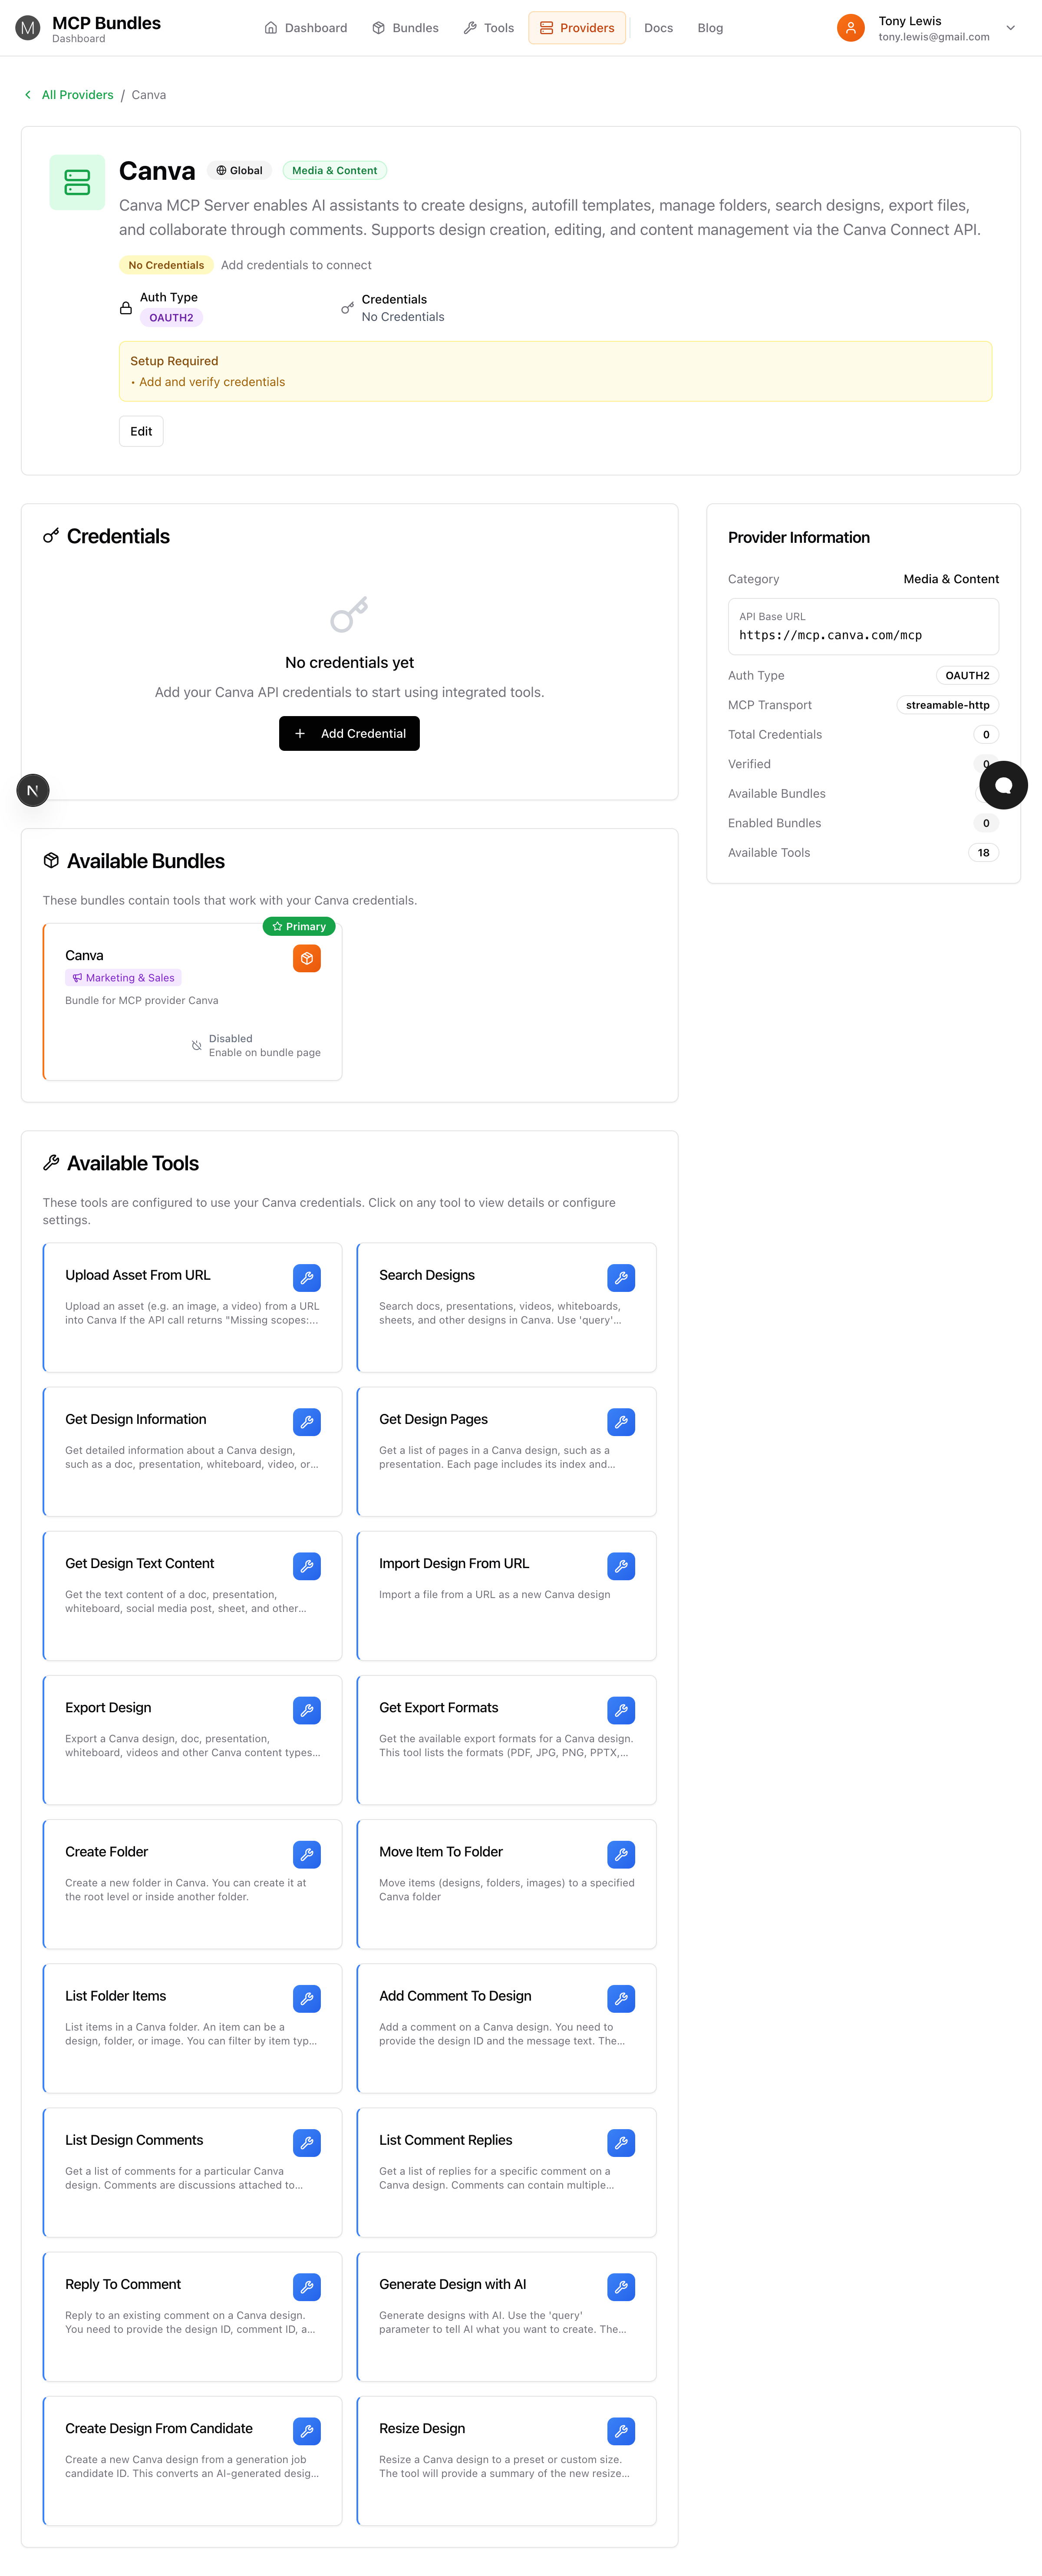
When to use: Adding credentials before choosing bundles
- Go to Dashboard → Providers
- Click on a provider card
- Click the "Add Credential" button
- Credential panel slides in from the right side
Option C: From Add Tool Dialog
When to use: While customizing a bundle's tools
- In a bundle, click "+ Add Tool"
- Select a provider
- Click "+ Add New" to create a credential
- Credential panel slides in from the right side
What happens next depends on the credential type:
- API Key → Fill in fields and click "Create Credential"
- OAuth → Click OAuth button, authorize in popup window
- None → Connection created automatically (no auth needed)
Adding API Key Credentials
Modern providers use schema-driven credentials - the credential panel dynamically generates fields based on what the provider needs.
Example: Single-Field Credential (Resend)
When you add a Resend credential in the credential panel:
API Key Field:
- Label: "API Key"
- Type: Password (with show/hide toggle)
- Description: "Your Resend API Key. Get it from https://resend.com/api-keys"
- Placeholder:
re_...
Steps:
- Credential panel opens on the right side
- Paste your API key from Resend dashboard
- (Optional) Enter a Credential Name (e.g., "Production", "Staging")
- (Optional) Click eye icon to verify it's correct
- Click "Create Credential"
- 🎯 Validation tool picker automatically opens
Result: Credential saved with "UNVERIFIED" status. Select a validation tool and click "Validate Now" to test it!
Example: Multi-Field Credential (Database)
Some providers require multiple fields:
PostgreSQL Credential Form:
- Host - Database server address (e.g.,
localhost) - Port - Port number (default:
5432) - Database - Database name
- Username - Database user
- Password - User password (masked)
Steps:
- Fill in all required fields (marked with *)
- Optional fields can be left empty
- Click "Create Credential"
Where to Find API Keys
Each provider has their own location:
Resend:
- Go to https://resend.com/api-keys
- Click "Create API Key"
- Copy the key immediately (only shown once)
OpenAI:
- Go to https://platform.openai.com/api-keys
- Click "Create new secret key"
- Copy and save immediately
HubSpot:
- Settings → Integrations → API Key
- Click "Show" or "Generate"
- Copy the key
Always store API keys in a secure location (password manager) before pasting into MCPBundles.
Adding OAuth Credentials
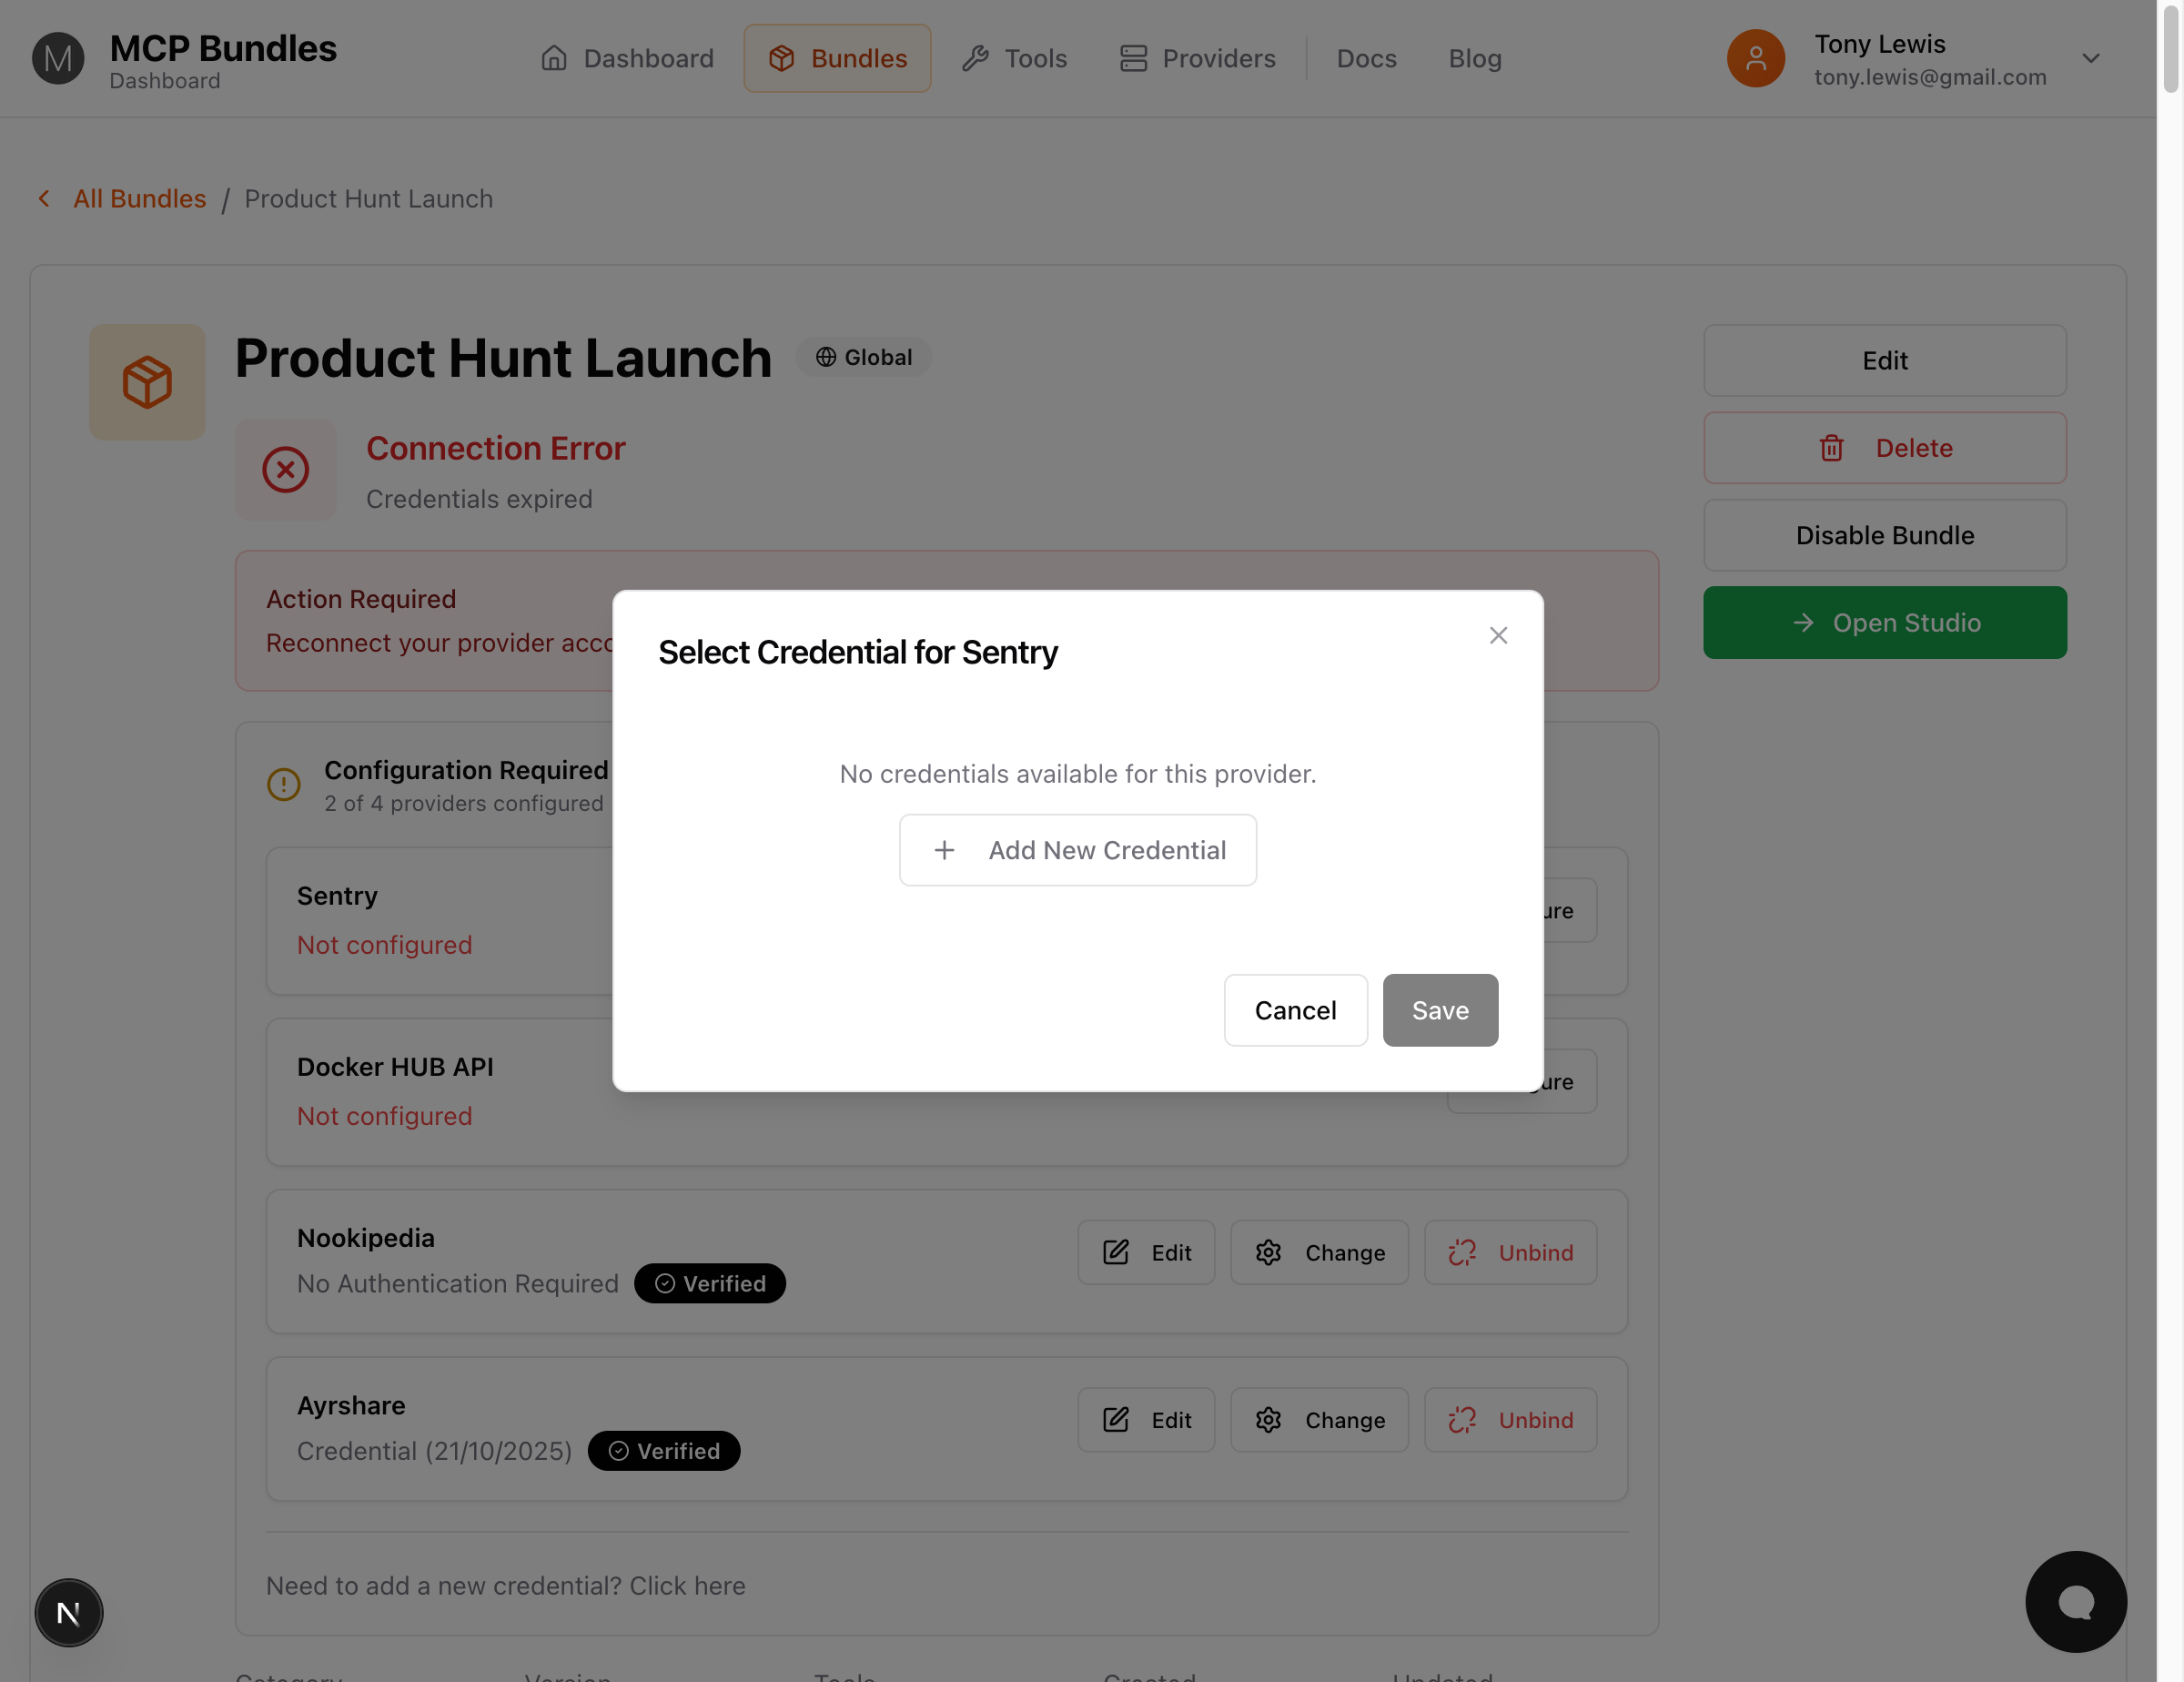
OAuth is the most secure authentication method. The credential panel stays open throughout the entire process!
How OAuth Works (New Context-Aware Flow)
- Credential panel opens on the right side
- (Optional) Enter a credential name (e.g., "Work GitHub", "Production Slack")
- Click "Connect with [Provider]" button
- OAuth window opens → Log in to provider
- Review permissions → See what access is requested
- Click "Allow" → Authorize MCPBundles
- OAuth window closes → You return to the bundle/provider page
- 🎯 Credential panel automatically reopens! (Context-aware return)
- 🎯 Validation tool picker automatically opens!
- Select a validation tool and click "Validate Now"
Key Feature: The credential panel remembers where you were and reopens automatically after OAuth completes. No need to navigate back!
Example: Connecting Google
- Click "Add Credential" on Google provider
- Click "Authorize with Google"
- Popup opens → Select your Google account
- Review requested permissions:
- View and manage Gmail
- View and manage Calendar
- View Drive files
- Click "Allow"
- Popup closes automatically
- Credential is saved and ready to validate
OAuth Scopes
Scopes determine what your AI can access:
Read-only scopes:
- View emails (Gmail)
- Read calendar events
- List repositories (GitHub)
Write scopes:
- Send emails
- Create calendar events
- Create/update GitHub issues
Why scopes matter:
- More specific permissions = more secure
- Tools only work if required scopes are granted
- You can revoke access anytime
Managing OAuth Tokens
OAuth tokens are automatically refreshed by MCPBundles when they expire. You don't need to reconnect unless:
- You explicitly revoke access in the provider's app
- The provider changes their required scopes
- The credential shows "ERROR" status
Validating Credentials
After adding a credential, you must validate it to confirm it works.
Why Validate?
Validation:
- Confirms credentials are correct
- Tests API connectivity
- Checks permissions (OAuth scopes)
- Activates tools
- Prevents runtime errors
The Validation Process
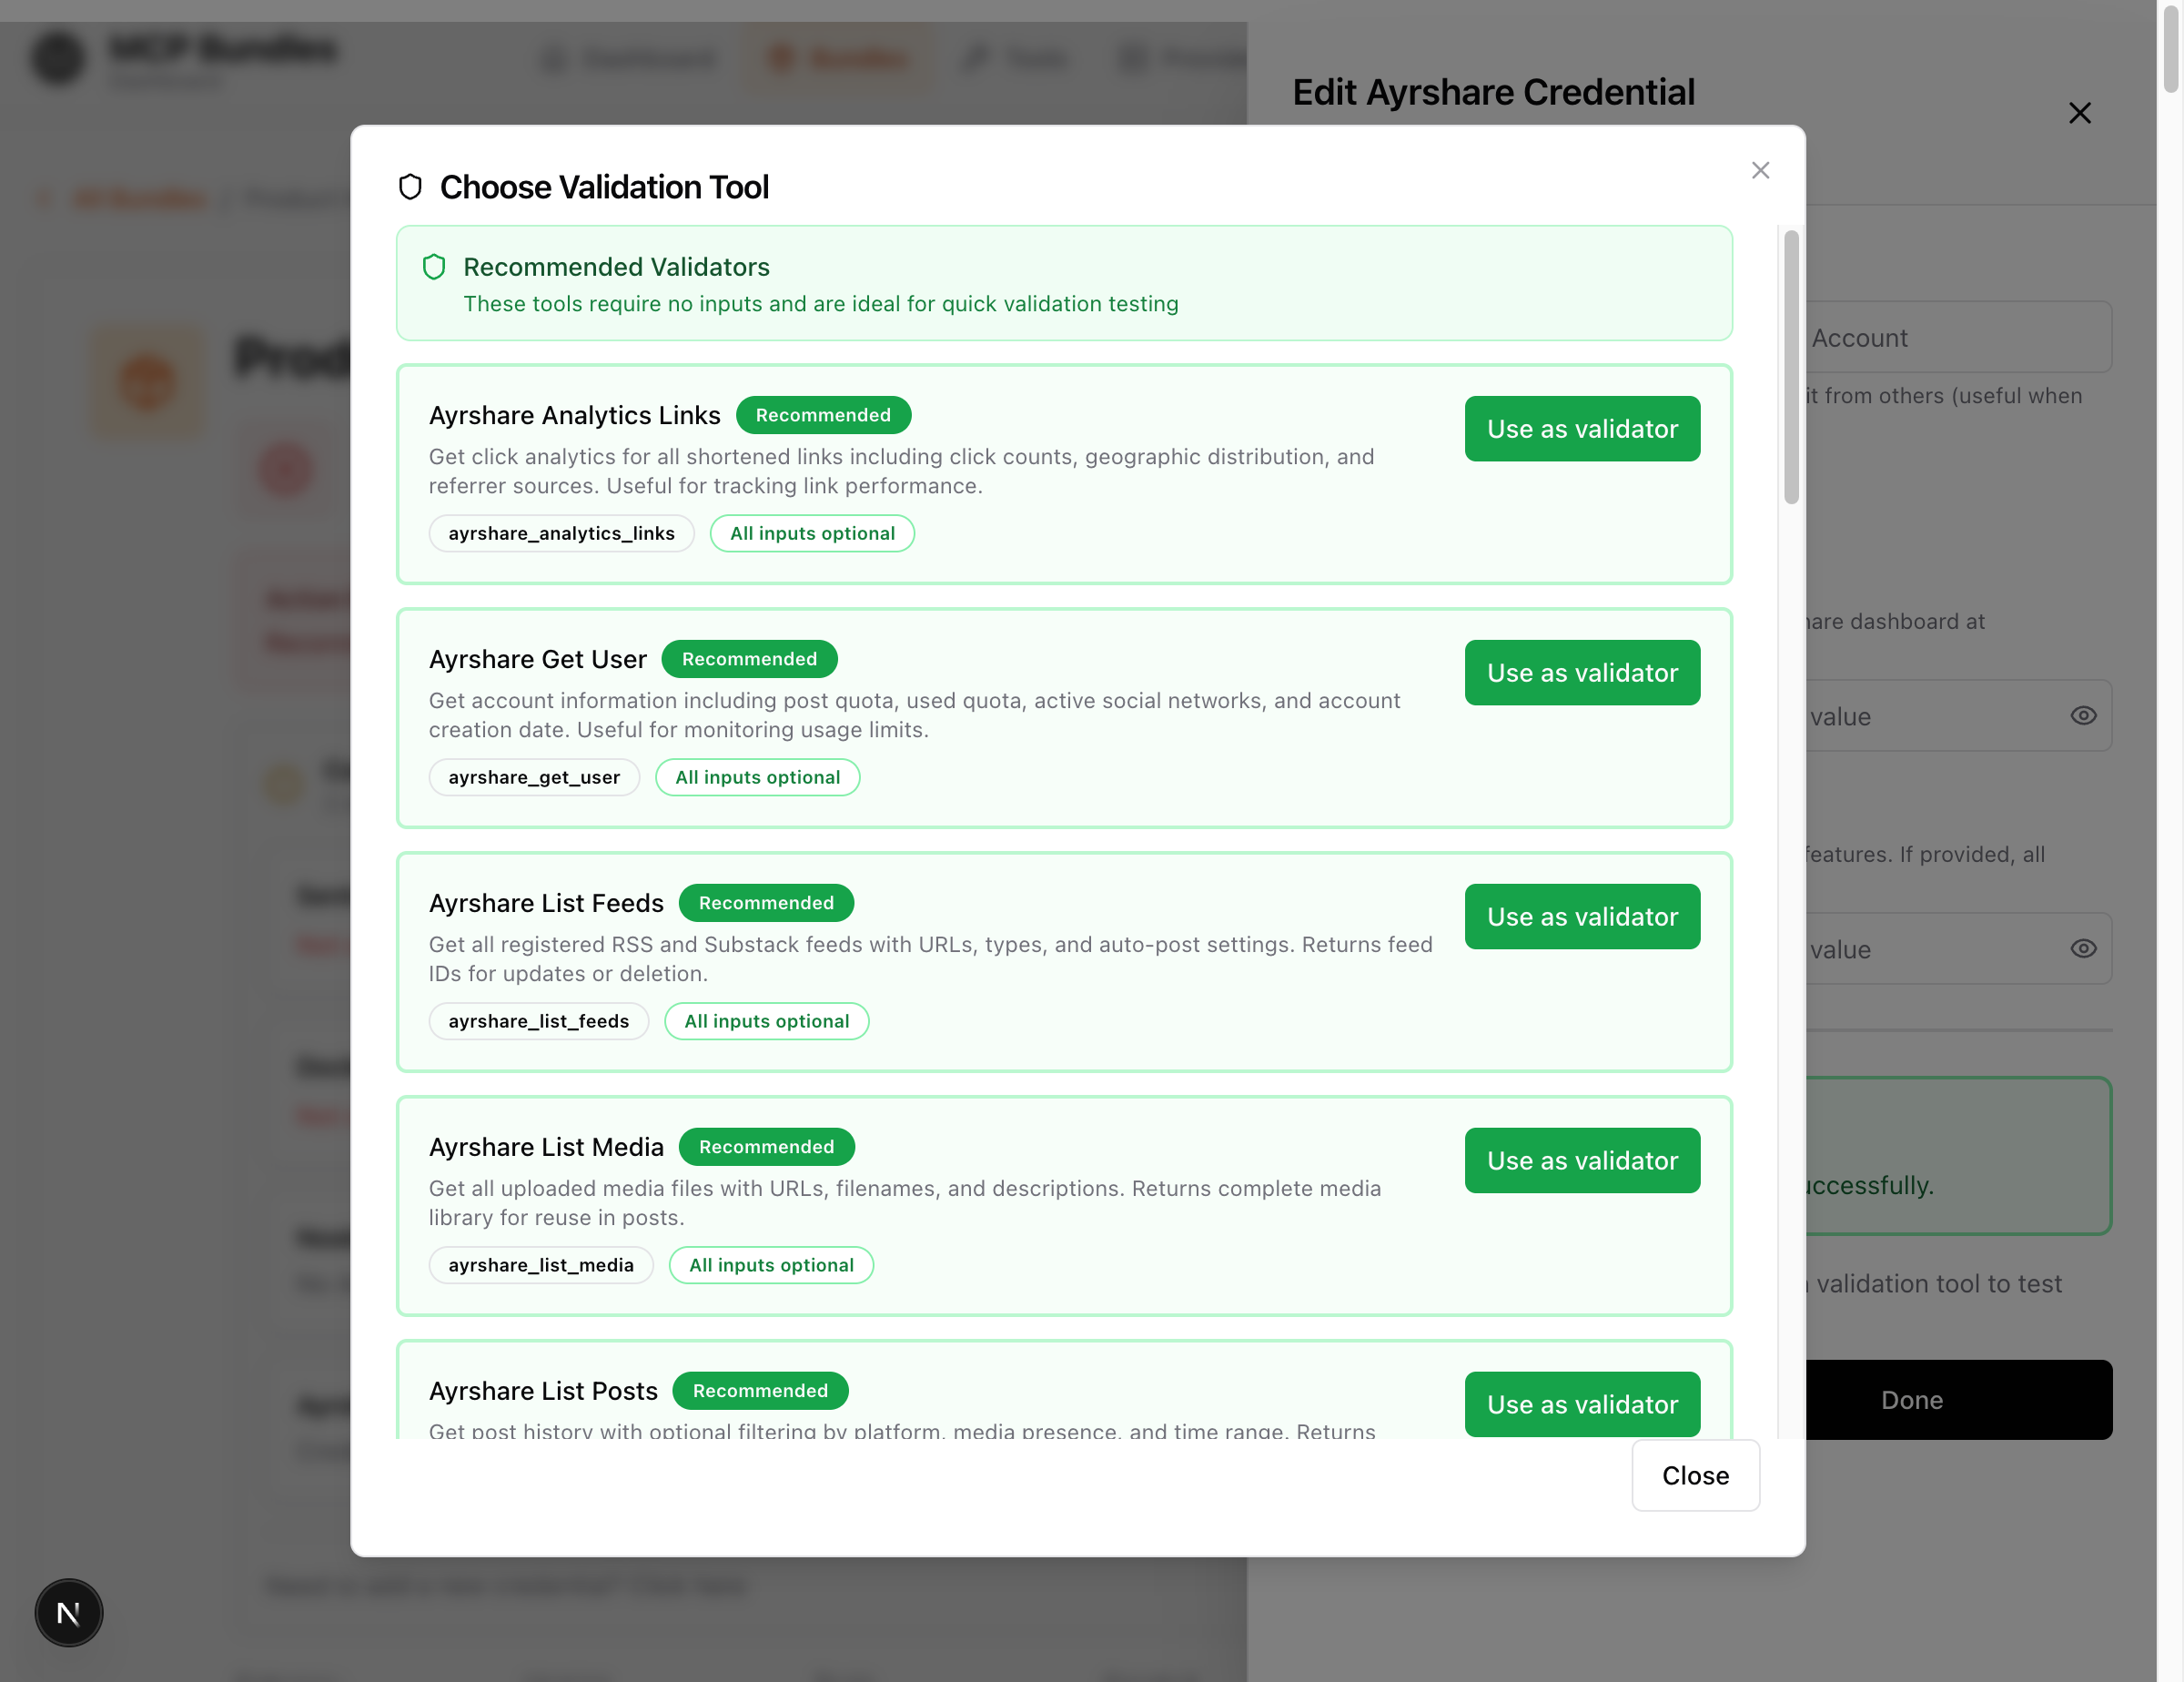
After creating a credential, the validation tool picker automatically opens:

Step 1: Choose a Validation Tool
The picker opens automatically showing all available tools for this provider.
Status Badge shows: "UNVERIFIED" (yellow/amber)
- Look for "Recommended" badges - These tools are safe and simple
- Select a simple, safe tool (usually a list/fetch operation)
- Click "Use as validator" on your chosen tool
Examples of good validation tools:
list_campaigns(Smartlead) - Lists email campaignsget_user(Google) - Gets your user profilelist_repos(GitHub) - Lists your repositoriesfetch_account_info(Stripe) - Gets account detailsanalytics_links(Ayrshare) - Gets analytics data
Avoid validation tools that:
- Create or delete data
- Send emails or messages
- Cost money (like SMS)
- Require complex parameters
Step 2: Configure Validation Parameters (If Needed)
Most validation tools don't need parameters, but some do:
Example: get_campaign needs campaign_id
- After selecting the tool, you'll see a "Validation Parameters" section
- Click "Configure" to open the parameter form
- Fill in required parameters (use test data or IDs you know exist)
- Click "Save"
Tip: Choose tools without parameters when possible - they're faster to validate!
Step 3: Run Validation
After selecting a tool (and configuring parameters if needed):
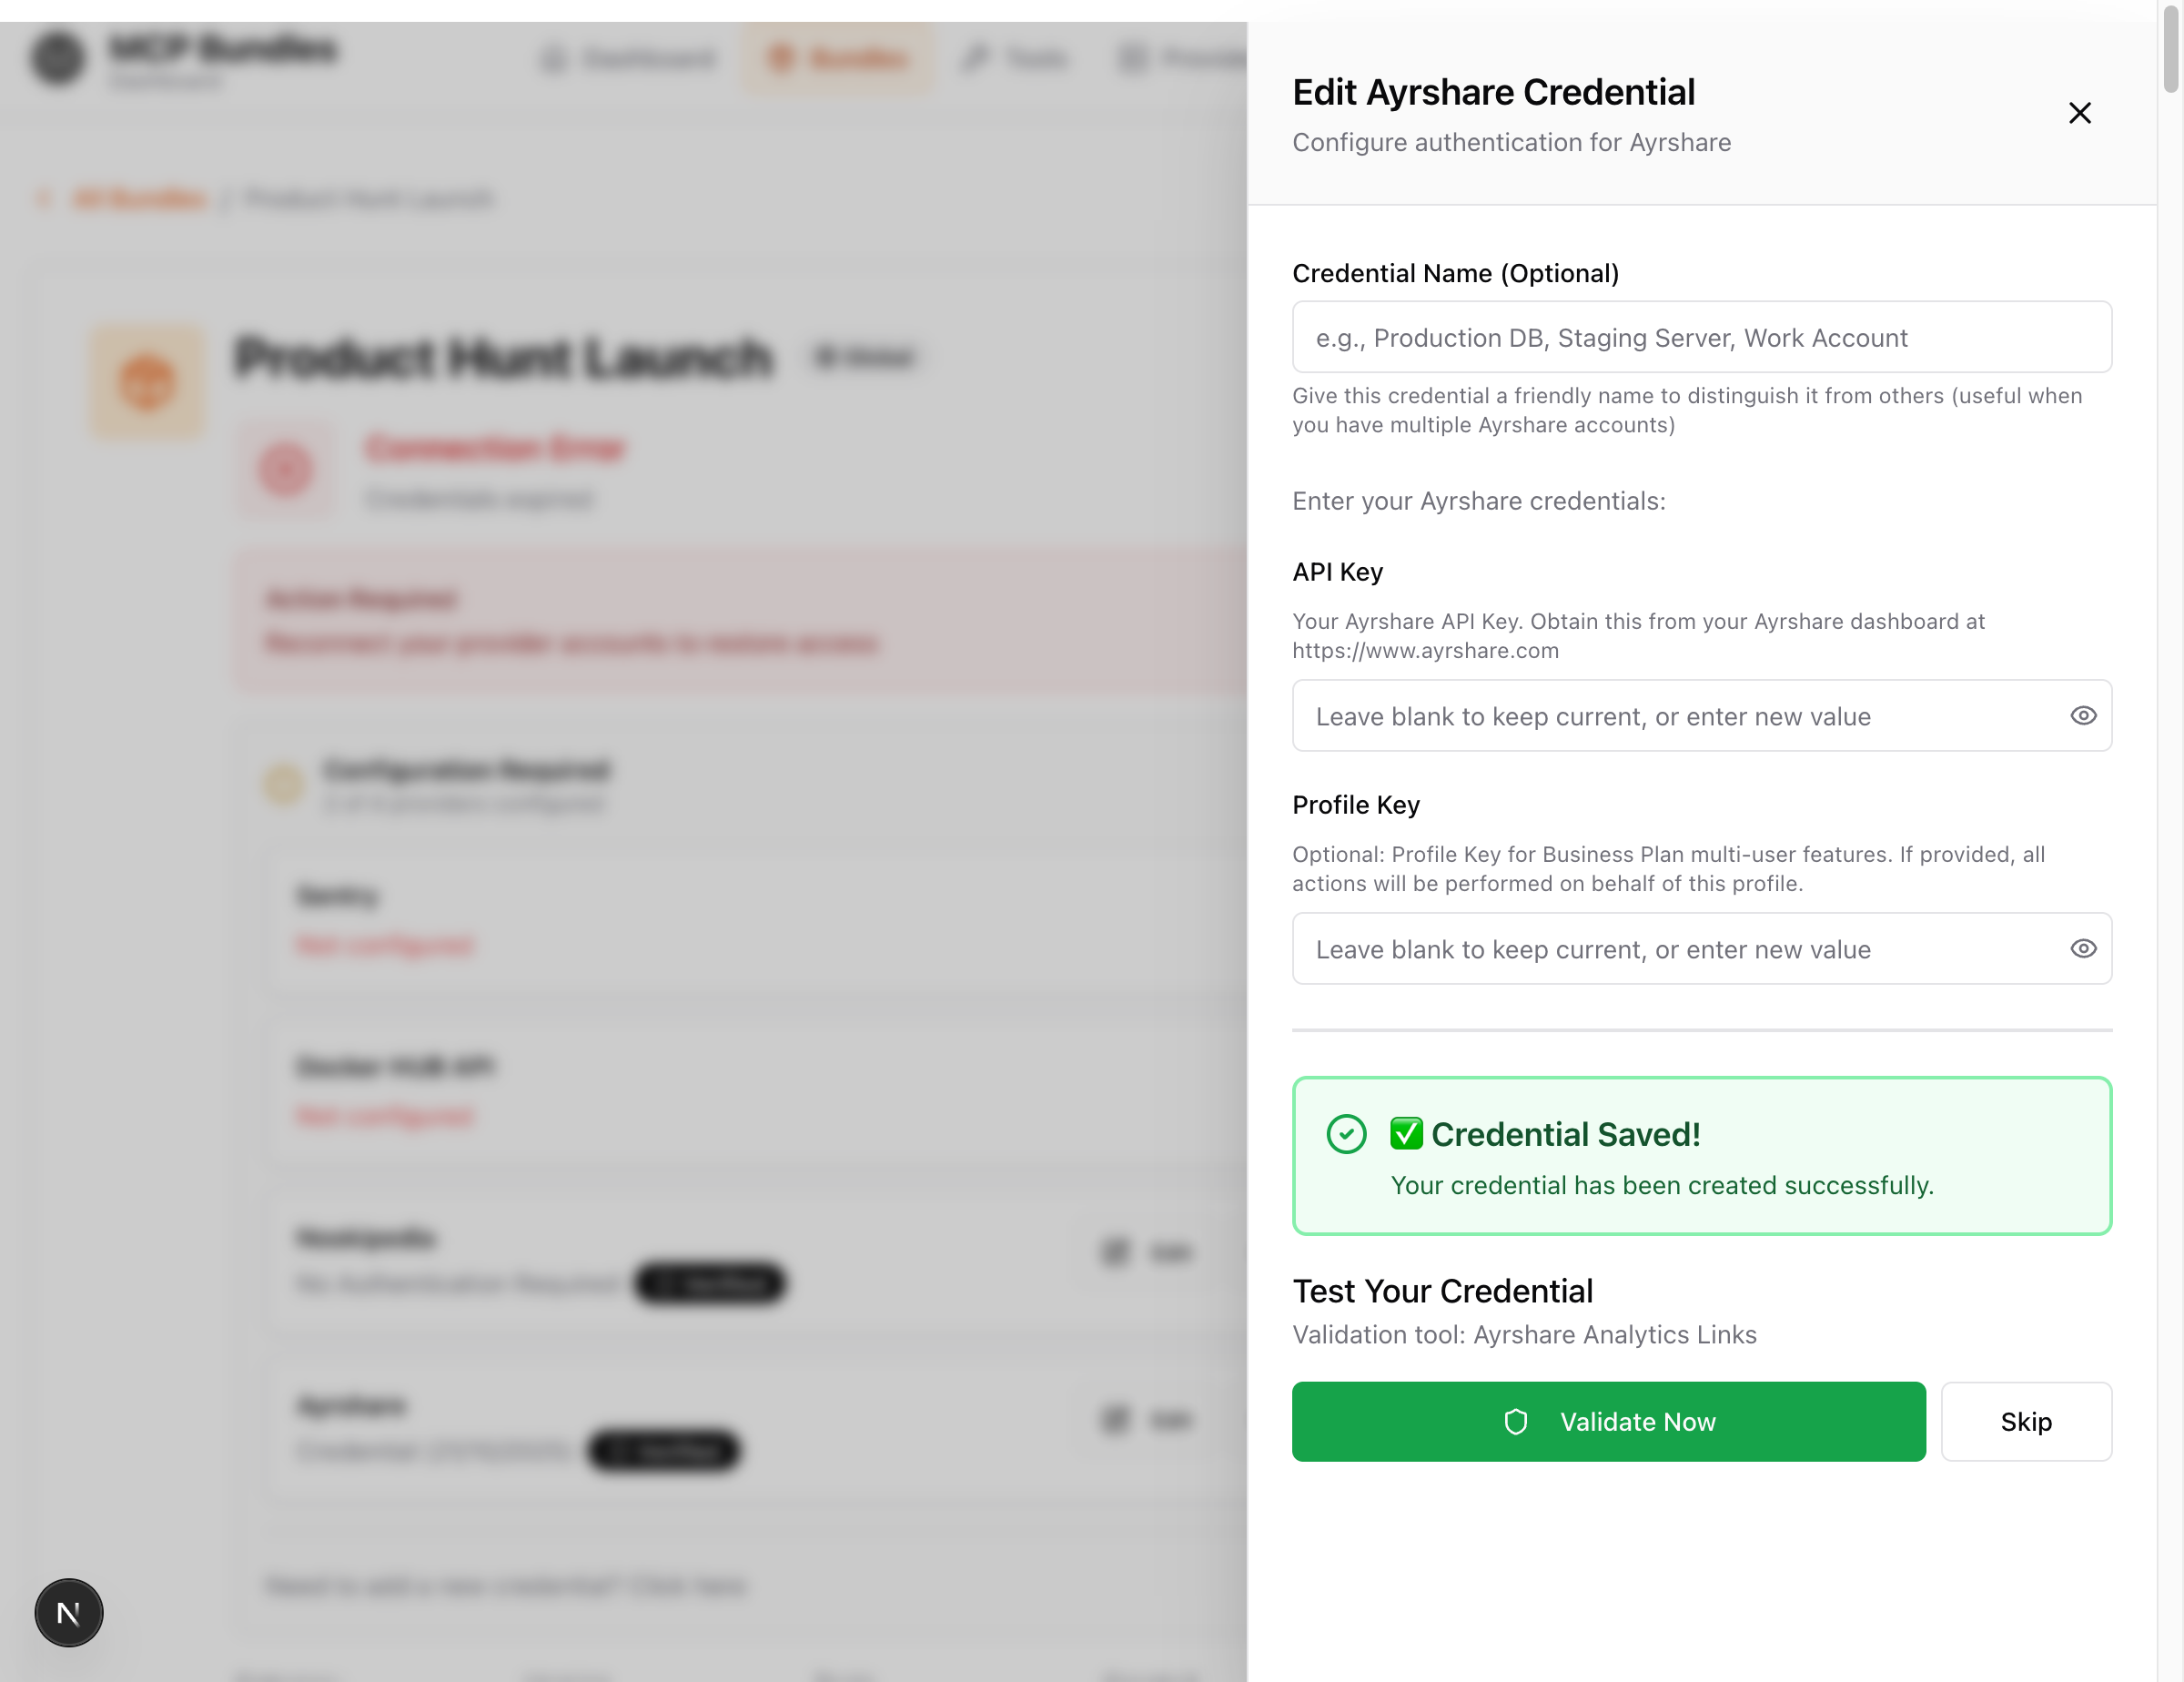
- Click the large green "Validate Now" button
- System calls the validation tool with your credential
- Wait 1-3 seconds for results
Three possible outcomes:
✅ VERIFIED - CREDENTIAL VALIDATED
- Green badge with checkmark icon
- Credential works perfectly
- All tools are now available
- Panel may close automatically
🟡 UNVERIFIED - NEEDS VALIDATION
- Yellow badge with warning icon
- Haven't validated yet or validation tool not selected
- Choose a validation tool and run it
❌ ERROR - VALIDATION FAILED
- Red badge with X icon
- Something went wrong (wrong API key, insufficient permissions, etc.)
- Check error message for details
- See Troubleshooting for common fixes
Re-Validating Credentials
Credentials should be re-validated when:
- You change the credential data
- Provider API changes
- Error status appears
- Tools stop working unexpectedly
How to re-validate:
From Bundle Page:
- Go to your bundle
- Click "Edit" next to the provider credential
- Credential panel opens
- Click "Re-validate" button
- System runs the validation tool again
From Provider Page:
- Go to Dashboard → Providers → Select provider
- Find your credential card
- Click "Re-validate" button
- System runs the validation tool again
Editing Credentials
You can edit credentials to:
- Update API keys (after rotation)
- Change multi-field values
- Modify validation tool selection
- Update validation arguments
Editing API Key Credentials
From Bundle Page:
- Go to your bundle
- Find the provider in the Configuration section
- Click "Edit" next to the credential
- Credential panel slides in showing masked values
- Make your changes
- Click "Update Credential"
- Re-validate to confirm changes work
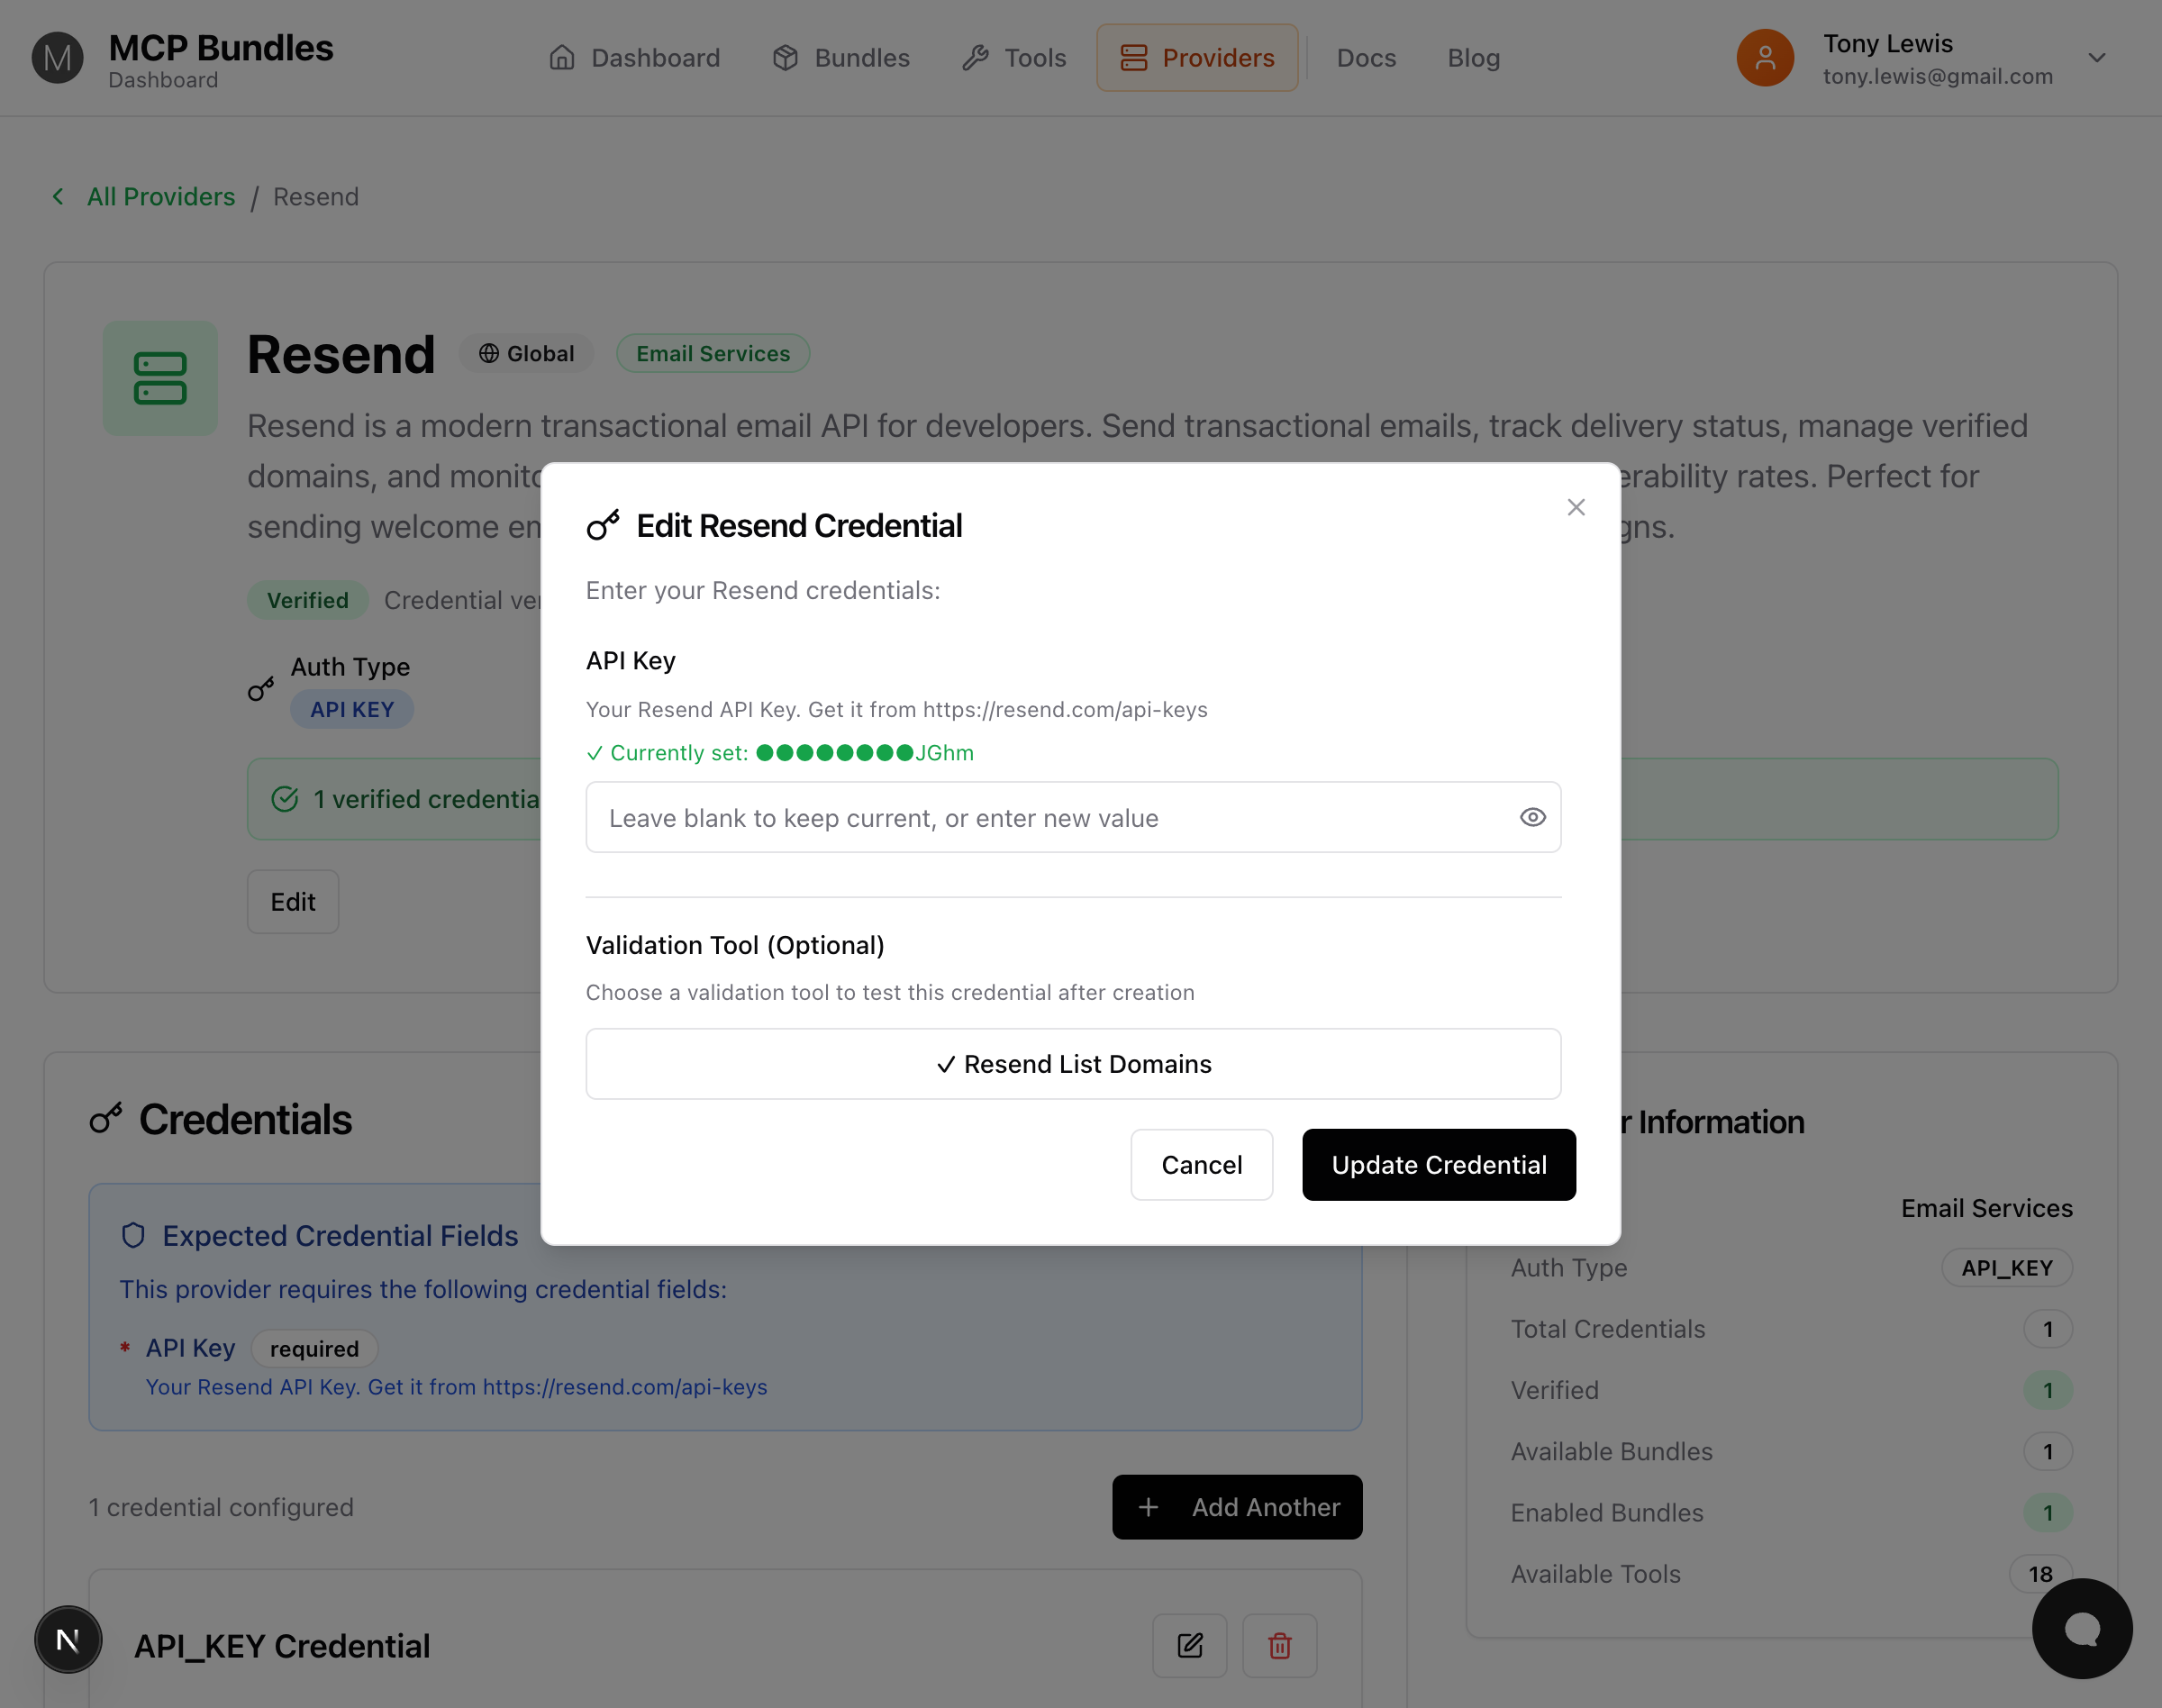
From Provider Page:
- Go to Dashboard → Providers → Select provider
- Find your credential card
- Click the "Edit" button (pencil icon)
- Credential panel opens showing:
- Masked values - Sensitive data shown as
●●●●●●●●last4 - Show button - Click eye icon to reveal full value
- Form fields - Edit any field
- Masked values - Sensitive data shown as
- Make changes
- Click "Update Credential"
- Re-validate to confirm changes work
After editing:
- Credential status becomes "UNVERIFIED"
- You must re-validate to confirm changes work
Always validate after editing to ensure the new credential data is correct!
Editing OAuth Credentials
OAuth credentials cannot be edited directly. To change the connected account:
- Open the credential (Edit button)
- Click "Connect with [Provider]" again → Reauthorize with new account
- Credential panel reopens automatically after OAuth
- Validate the new credential to confirm it works
Changing Validation Tool
You can change which tool validates your credential:
- Open the credential (Edit button)
- Click "Select Validation Tool" or "Change Tool"
- Validation tool picker opens
- Select a new tool from the list
- (Optional) Configure parameters if needed
- Click "Validate Now" to test with the new tool
- Run validation with the new tool
When to change validation tool:
- Current validation tool is unreliable
- Tool requires parameters you don't have
- Want to test a different permission scope
- Previous tool was deprecated
Managing Multiple Credentials
You can have multiple credentials per provider for:
- Different accounts - Personal vs work
- Different environments - Staging vs production
- Different permission scopes - Read-only vs full access
- Team members - Each person's credentials
Viewing All Credentials
On Bundle Page:
- View credentials bound to specific providers for that bundle
- See which credential is currently selected for each provider
- Quick access to Edit, Change, or Unbind
On Provider Page: Go to Dashboard → Providers → Select provider to see:
- All credentials listed as cards
- Each shows:
- Verification status (VERIFIED, UNVERIFIED, ERROR)
- Masked credential data
- Validation tool being used
- Last validated timestamp
- Edit and Delete buttons
Selecting Which Credential to Use
On Bundle Page:
- Click "Configure" next to a provider
- Dialog shows all available credentials for that provider
- Select the credential you want to use
- Click "Save"
When a bundle uses a provider, MCPBundles prioritizes credentials in this order:
- The credential you explicitly selected for that bundle
- First VERIFIED credential if no selection made
- First UNVERIFIED credential if none verified
- ERROR credentials are skipped
Best practice: Explicitly select credentials for each bundle if you have multiple accounts.
Deleting Credentials
When to delete a credential:
- No longer using that provider
- Credential was compromised
- Switching to a different account
- Testing is complete
How to Delete
From Bundle Page:
- Go to your bundle
- Find the provider credential
- Click "Unbind" to remove from bundle (keeps credential)
- Or click "Edit" → "Delete Credential" to permanently delete
From Provider Page:
- Go to Dashboard → Providers → Select provider
- Find the credential card
- Click "Delete" button (trash icon)
- Confirm deletion in the modal
Deletion is immediate and irreversible!
Deleting a credential:
- Removes it from database permanently
- Invalidates all bundles using it
- Cannot be undone
- Does NOT revoke OAuth tokens at the provider (do that separately)
Revoking OAuth Access
After deleting an OAuth credential, also revoke access at the provider:
Google:
- Go to https://myaccount.google.com/permissions
- Find "MCPBundles"
- Click "Remove Access"
GitHub:
- Settings → Applications → Authorized OAuth Apps
- Find "MCPBundles"
- Click "Revoke"
Slack:
- Workspace Settings → Apps
- Find "MCPBundles"
- Click "Remove"
Security & Best Practices
Credential Security
MCPBundles takes security seriously:
Encryption:
- All credentials encrypted at rest in database
- Encryption keys stored separately
- TLS for all API communications
Access Control:
- Only you can access your credentials
- Not visible to other users
- Not shared between accounts
Masking:
- Sensitive data shown as
●●●●●●●●last4 - Full values never logged
- UI requires explicit "Show" action
Best Practices
DO:
- Use OAuth whenever available (more secure than API keys)
- Validate immediately after adding
- Re-validate after making changes
- Use minimal required scopes (read-only when possible)
- Delete credentials you no longer need
- Rotate API keys regularly
- Keep API keys in a password manager
DON'T:
- Share API keys with others
- Commit API keys to version control
- Use production credentials for testing
- Grant more permissions than needed
- Ignore ERROR status credentials
- Leave unvalidated credentials
Troubleshooting
"Validation Failed" Error
Possible causes:
-
Invalid API key
- Fix: Double-check the key, copy again from provider
- Ensure no extra spaces when pasting
-
Insufficient permissions (OAuth)
- Fix: Reconnect and approve ALL requested scopes
- Check provider's app settings
-
Provider API is down
- Fix: Wait a few minutes and try again
- Check provider's status page
-
Rate limit exceeded
- Fix: Wait 15-60 minutes
- Choose a different validation tool
"Cannot connect to provider" Error
Possible causes:
-
Firewall blocking MCPBundles
- Fix: Whitelist
*.mcpbundles.comin your firewall
- Fix: Whitelist
-
Provider requires IP whitelisting
- Fix: Add MCPBundles IPs to provider's allowlist
- Contact support for IP addresses
-
Provider endpoint changed
- Fix: Re-add the credential
- Contact support if issue persists
OAuth Popup Blocked
Fix:
- Allow popups for
mcpbundles.comin browser settings - Click "Connect with [Provider]" again
- Popup should now open
"Scope mismatch" Error
Cause: Provider requires different OAuth scopes than previously granted.
Fix:
- Delete the credential
- Add it again
- Approve ALL requested permissions in OAuth flow
- Validate
Credential Shows as "Expired"
OAuth tokens: Automatically refreshed by MCPBundles. If you see "expired":
- Try re-validating (may trigger refresh)
- If still fails, reconnect OAuth
API keys: Don't expire unless provider rotates them. If not working:
- Generate new key from provider
- Edit credential and paste new key
- Validate
Next Steps
- Choose a Bundle - Enable bundles that use your credentials
- Connect Your AI - Set up ChatGPT, Claude, or Cursor
- Test Tools - Use Bundle Studio to test tools
- Troubleshooting - Fix credential issues
Need Help?
- Credential issues? See Credential Troubleshooting
- Questions? Check the FAQ
- Support: Email help@mcpbundles.com